Arquivo
Watson Explorer Content Analytics installation – Steps
I installed Watson Explorer Content Analytics several times in the last months, then, I created a simple Step by step that can be useful to who is starting to work with this. I’m sharing here, please, fell free to add any comment and help me to improve this how-to. Hope that can be useful to you if you are here :D.
Pre-Installation Checklist / Pre-requisites
The following steps should be performed to prepare the server for software installation. This step by step cover the installation in a Red Hat 7 machine. The following 32-bit libraries are required on Linux x86-64 systems:
- libstdc++33 (compat-libstdc++-33.i686 / libstdc++33-32bit)
- libstdc++ (libstdc++.i686 / libstdc++6-32bit)
- zlib (zlib.i686 / libz1-32bit / zlib-32bit)
- libXext (libXext.i686 / libXext6-32bit / xorg-x11-libXext-32bit)
- libXft (libXft.i686 / libXft2-32bit / xorg-x11-libs-32bit)
- libXi (libXi.i686 / libXi6-32bit / xorg-x11-libs-32bit)
- libXp (libXp.i686 / libXp6-32bit / xorg-x11-libXp-32bit)
- libXtst (libXtst.i686 / libXtst6-32bit / xorg-x11-libs-32bit)
- libXm (if thumbnails are needed)
- libXt (if thumbnails are needed)
- java-1.8.0-ibm-1.8.0.2.10-1jpp.7.el6.x86_64
- Httpd
The commands to install the libraries are:
- yum install -y libstdc++.i686 libXext.i686 libXft.i686 libXi.i686 libXp.i686 libXtst.i686 libXt.i68
- yum install -y zlib.i686 httpd
- yum -y install apr apr-util boost-filesystem boost-iostreams boost-program-options boost-regex boost-serialization
-
If SELinux is enabled, then it will need to be disabled during installation of WEX
-
Ensure that the disk space has been allocated to the WEX installation path
-
The default path is /opt/ibm/dataexplorer
-
Ensure that the disk space for /tmp partition have sufficient space for the installation, at least 10 gb
If not assign the tmp to a directory that has extra space with the commands:
- mkdir /opt/IBM/dataexplorer/tmp
- export IATEMPDIR=/opt/IBM/dataexplorer/tmp
-
Install a web server to run the Foundational Components -> On Linux install the latest version of Apache (not required for AC)
-
Ensure that the LINUX subscription libraries are available for the yum command
-
DB2 connect client configured
-
Install Java – java-1.8.0-ibm-1.8.0.2.10-1jpp.7.el6.x86_64 (you can get the package from oracle also, make sure to add Java to the server path)
Users and Folders creation for WEX AE (must be perform with root level access)
- Add installation account (esadmin) for server install.
- useradd esadmin
- create a password for the esadmin user (usually esadmin12)
- Create Watson Directories
- mkdir -p /watson/archives
- Copy the installation tarball onto the server into.
- Untar the tarball that contains installation files.mkdir /opt/IBM/dataexplorer/WATSON_EXPR_ADV_EAC_V11.0.2_LNX_M
cd /opt/IBM/dataexplorer /WATSON_EXPR_ADV_EAC_V11.0.2_LNX_M
tar -xvf ./watson/archives/WATSON_EXPR_ADV_EAC_V11.0.2_LNX_M.tar
WEX AE Installation Details:
- (Note must be performed with root level access) Install the software. (Note: Responses for Master node when selecting server type)
-
- cd /opt/IBM/dataexplorer/WATSON_EXPR_ADV_EAC_V11.0.2_LNX_M/
- ./install.bin -i console
- Installation Responses: (Also see installation screenshots below)
- Choose Locate : English
- PRESS TO CONTINUE:
- Press Enter to continue view license agreement or 1 to accept: 1 (accept)
- Enter fully qualified hostname of this server: (Hostname will be detected, hit enter. see example below)
-
- Administrator user name: (Default: esadmin): (Hit enter to take default)
-
- Create user account Enter the Number for your choice..: 2 ( the administrator user account ‘esadmin’ already exists)
-
- Enter Administrator Account password: your_esadmin_password that you created for the user earlier (esadmin12)
-
- Select a Server Type: (Response depends on type of server being installed on)
- (1 –Master all on one server )
- Select a Server Type: (Response depends on type of server being installed on)
If installation is consists of a single server.
-
-
- (2 -Master Distributed Server )
-
If installation consists of multiple servers, and the current server is the Master server
-
-
- (3 -Additional Server )
-
If the installation is for a server (ie.. Search Server) that will connect to a Master
Select: 1
-
- Do you want to install advanced options: 1 (YES)
- Enter absolute path of the data directory ES_NODE_ROOT (default: /opt/IBM/dataexplorer/esdata ) /opt/IBM/dataexplorer/esdata
- Enter the absolute path to install : /opt/IBM/dataexplorer/es
-
- Common Communication Layer Port (default: 6002) Hit enter for the default
-
- Search Server ESSearchServer Port (default: 8394) Hit enter for the default
-
- Web Application Server (default embedded) 1 –embedded
-
- Enterprise Search Application and Content Analytics Miner Port (default 8393) Hit enter for the default
-
- THE INSTALLATION WILL BEGIN AND RUN ABOUT 5-10 MINUTES
- THE INSTALLATION WILL BEGIN AND RUN ABOUT 5-10 MINUTES
…
-
- This completes the WAC (Watson Content Analytic) installation
- You can start esadmin to test:
- /opt/IBM/es/bin/esadmin system startall
- Go to admin console and check:
- http://:8390/ESAdmin/
Install SIRE (Statistical Information and Relation Extraction) module
1. Stop esadmin – /opt/IBM/es/bin/esadmin system stopall
2. Iinstall the pre-req libraries:
yum -y install apr apr-util boost-filesystem boost-iostreams boost-program-options boost-regex boost-serialization
- go to /opt/IBM/dataexplorer/es/bin/sire and run
rpm -ivh sire-20161109-1.x86_64.rpm
- Stop esadmin – /opt/IBM/es/bin/esadmin system stopall
- Start esadmin – /opt/IBM/es/bin/esadmin system startall
- Installation is complete
Uninstall Notes
To Uninstall the WAC application (Note must be performed with root access), switch to root level account and perform the command:
/opt/IBM/dataexplorer/es/uninstall_11.0.1.0./uninstall_11.0.1.0 -i console
WEX AE System Start-up / Shutdown
To stop the services:
- /opt/IBM/es/bin/esadmin system stopall
To start the services:
- opt/IBM/es/bin/startccl.sh -bg
- /opt/IBM/es/bin/esadmin system start
- /opt/IBM/es/bin/esadmin system startall
Disk Space script for Linux
Sometimes I need to keep checking the disk space at my servers. So, I created the following script and add it to Crontab. If I have problems, Ill receive an email.
This can be useful to someone!
#!/bin/bash
# In my case im interested in a specific partition /opt/XYZ
SPACE=`df -h | grep /opt/XYZ | awk '{print $4}' | awk -F % '{print $1}'`

case $SPACE in
        9[1-9])
        echo "Disk space > 90 %, please check" | mail -s "Disk Space problem" email1@br.ibm.com,email2@br.ibm.com;;
        100)
        echo "Disk Full, please check" | mail -s "DISK FULL" email1@br.ibm.com,email2@br.ibm.com;;
esac
Creating a collection in IBM Watson Explorer crawling from Database
Perform a database Craw from a collection its something very common. With IBM Watson Explorer this is something very easy to do. In my example, Ill create a collection and will perform a simple query in a IBM DB2 database, but, the steps will be very similar for other databases, you just need to keep in mind that you will need the correct driver.
1- Put the driver in place:
Get the database jdbc and put in the correct folder, usually it is something like /opt/IBM/dataexplorer/WEX-11_0_2/Engine/lib/java/database/.
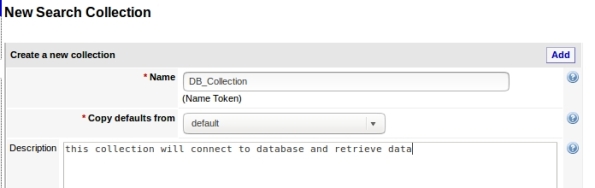
2- Create the collection copying defaults from default:
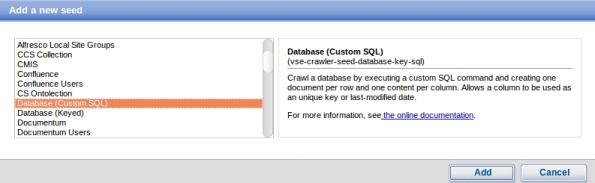
3- Add a new seed, this is where your collection will get data:

4- Choose Database:
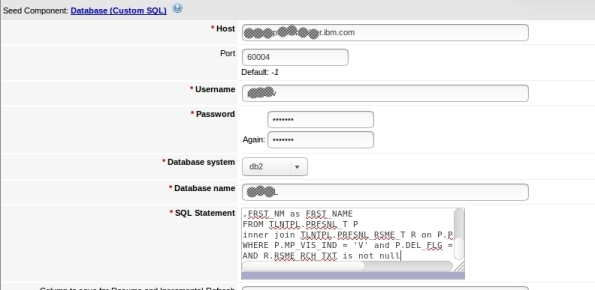
5- Enter your database settings and the query that will be performed:
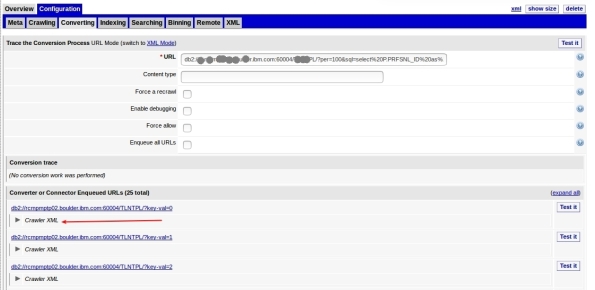
6- Its done, now you can test:
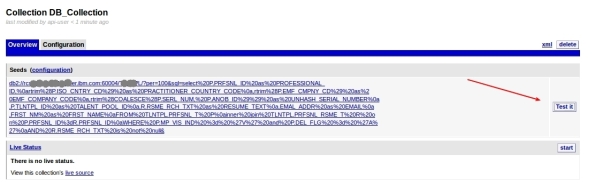
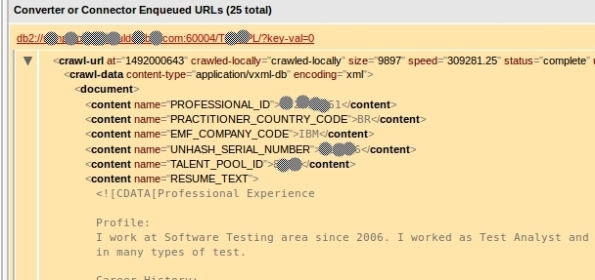
7- This can take a while depending on your query and connection, but when it finish, it will show some rows that the query returned in the following format. To see some row data, click Crawler XML:
8- Here is your data:
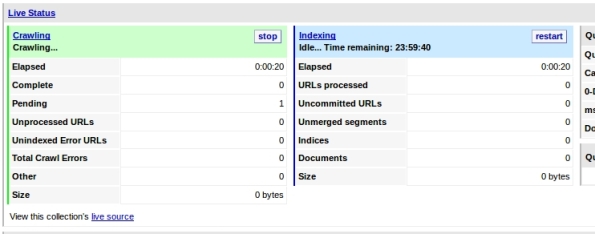
9- Now that we see that its working, you can start your craw. This step will feed your collection and can take a good time depending on your amount of data:

10-You must see Craw activity:
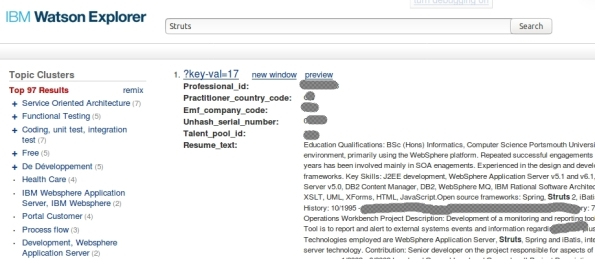
11- You can query your collection now to test, just enter your term and click search in the left options:
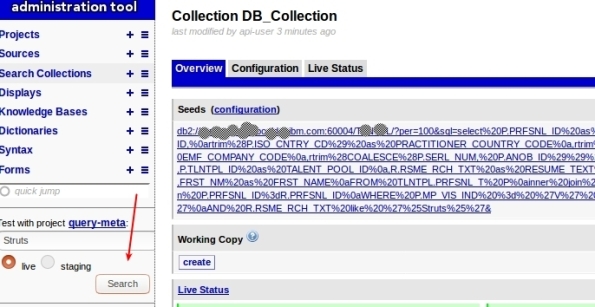
12- You will see something like this:
Thats it, you have created a collection that get data from Database!
Improving your queries at Watson Explorer using Ontolections
A good approach to enrich your queries at Watson Explorer its use Ontolections. A ontolection provides a set of related terms that are specific to the domain of an application or enterprise, and identifies the relationships between them. Basically, Wex Engine query the ontolection with the query terms, then, add this terms to the final query, and then, query your original collection.
For example: lets suppose that you have a synonym configured as: ALM → Application Lyfecycle Management. If user search for ALM, WEX engine will search also for Application Lyfecycle Management.
A ontolection can have also more than synonyms, we can have related terms, rewrite, spelling, etc. I recommend start with synonyms, then, improve your ontolection.
The first step to start playing with ontolections is create a Thesaurus file. This file will be used to create the ontolection. You can generate a thesaurus from several ways. The most common is create your own XML file manually, but, you can use something called Ontolection Trainer (Ill show how to use in the next posts).
For my example, I have created the following ontolection, it is called practitioner2.xml:
<?xml version="1.0" encoding="utf-8" ?>
<thesaurus name="practitioner1" language="english" domain="general">
<word name=".NET">
<synonym>.Net development</synonym>
<synonym>.Net<span style="font-family: Droid Sans Fallback;"><span style="font-size: small;"><span lang="zh-CN">開発</span></span></span></synonym>
<synonym>.NET<span style="font-family: Droid Sans Fallback;"><span style="font-size: small;"><span lang="zh-CN">開発</span></span></span></synonym>
</word>
<word name="Virtual Private Network">
<synonym>VPN</synonym>
<synonym><span style="font-family: Droid Sans Fallback;"><span style="font-size: small;"><span lang="zh-CN">バーチャル プライベート ネットワーク</span></span></span></synonym>
</word>
<word name="DNS">
<synonym>Domain Name Service</synonym>
<synonym><span style="font-family: Droid Sans Fallback;"><span style="font-size: small;"><span lang="zh-CN">ドメインネーム・サービス</span></span></span></synonym>
<synonym><span style="font-family: Droid Sans Fallback;"><span style="font-size: small;"><span lang="zh-CN">ドメインネームサービス</span></span></span></synonym>
</word>
</thesaurus>
Using this as an example, if user search for DNS, Ill also search for Domain Name Services.
After create your thesaurus file, you need to create a new collection at your WEX Server. Select generic-ontolection at Copy defaults from:
Then, add a new seed, pointing to the thesaurus file, in my case, I select FILES and add /opt/IBM/dataexplorer/WEX-11_0_1/Engine/nlq/practitioner2.xml
Go to collection overview → Configuration → Converting, click edit and set the values as:
Finally, go to Overview and Click Start at Live Status (you can also test before start). You will see Craw and Index running, and Documents being added.
Thats it, your ontolection is ready to use. You can test at your application and at WEX query utility. Here is a simple REST call using my ontolection, see that I’m searching for DNS and automatically WEX will search also for Domain Name Service | ドメインネーム・サービス | ドメインネームサービス.
http://MY_SERVER:9080/vivisimo/cgi-bin/velocity?v.app=api-rest&v.username=MY_USER&v.password=MY_PASSWORD&v.indent=true&v.function=query-search&fetch-timeout=30000&output-display-mode=limited&arena=MY_ARENA&output-contents-mode=list&syntax-operators=and or () CONTAINING CONTENT %field%: + NEAR – NOT NOTCONTAINING NOTWITHIN OR0 quotes regex stem THRU BEFORE FOLLOWEDBY weight wildcard wildchar WITHIN WORDS site less-than less-than-or-equal greater-than greater-than-or-equal equal range&sources=MY_COLLECTION &output-contents=FIELD1 FIELD2&output-bold-contents=FIELD1 FIELD2&query=dns&query-condition-xpath=$FIELD3=’XXXXX’&query-object=&num-per-source=20&start=0&num=20&query-modification-macros=query-modification-expansion&extra-xml=<declare name=”query-expansion.enabled” /><set-var name=”query-expansion.enabled”>true</set-var><declare name=”query-expansion.user-profile” /><set-var name=”query-expansion.user-profile”>on</set-var><declare name=”query-expansion.ontolections” /><set-var name=”query-expansion.ontolections”>onto_practitioner</set-var><declare name=”query-expansion.max-terms-per-type” /><set-var name=”query-expansion.max-terms-per-type”>3</set-var><declare name=”query-expansion.automatic” /><set-var name=”query-expansion.automatic”>synonym:0.8,alternative:0.8,spelling:0.8,narrower:0.5,translation:0.5,broader:0.5,related:0.5</set-var><declare name=”query-expansion.suggestion” /><set-var name=”query-expansion.suggestion”></set-var><declare name=”query-expansion.query-match-type” /><set-var name=”query-expansion.query-match-type”>terms</set-var><declare name=”query-expansion.conceptual-search-similarity-threshold” /><set-var name=”query-expansion.conceptual-search-similarity-threshold”>0.1</set-var><declare name=”query-expansion.conceptual-search-metric” /><set-var name=”query-expansion.conceptual-search-metric”>euclidean-dot-product</set-var><declare name=”query-expansion.conceptual-search-candidates-max” /><set-var name=”query-expansion.conceptual-search-candidates-max”>euclidean-dot-product</set-var><declare name=”query-expansion.conceptual-search-sources” /><set-var name=”query-expansion.conceptual-search-sources”>MY_COLLECTION </set-var><declare name=”query-expansion.stem-expansions” /><set-var name=”query-expansion.stem-expansions”>false</set-var><declare name=”query-expansion.stemming-dictionary” /><set-var name=”query-expansion.stemming-dictionary”>english/wildcard.dict</set-var><declare name=”reporting.track-spelling” /><set-var name=”reporting.track-spelling”>false</set-var><declare name=”meta.stem-expand-stemmer” /><set-var name=”meta.stem-expand-stemmer”>delanguage+english+depluralize</set-var><declare name=”query-expansion.stemming-weight” /><set-var name=”query-expansion.stemming-weight”>0.8</set-var>
See that this parameter turn on the ontolection:
&query-modification-macros=query-modification-expansion
And at &extra-xml I have some specific settings.
Special attention to where I use onto_practitioner, use your ontolection name.
Also, pay attention that if you have more than one server or shards, settings can change.
Calling this REST API, analysing results you will see some output like:
<op-exp logic=”or” middle-string=”OR” name=”OR” precedence=”2″><term field=”query” input-type=”user” processing=”strict” str=”dns”/><term field=”query” relation=”synonym” str=”Domain Name Service”/><term field=”query” relation=”synonym” str=”ドメインネーム・サービス”/><term field=”query” relation=”synonym” str=”ドメインネームサービス”/></op-exp>
If you would like to test at WEX query utility, you should edit the project query-meta and add the following flags:
Enable query stopword removal → true
Query expansion match type→ Terms
Enable semantic expansion → true
And set the configurations like the following:
Thats it. Enjoy!
For more information about ontolection: http://www.ibm.com/support/knowledgecenter/en/SS8NLW_11.0.1/com.ibm.swg.im.infosphere.dataexpl.engine.tut.cs.doc/c_csearch-ontolection-tut.html
Introdução a Big Data e Apache Solr
Para quem está interessado em Big Data e além disso quer algo prático utilizando Apache Solr, disponibilizo um conjunto de slides que podem ser utilizados por Estudantes, Professores e profissionais. Usem e distribuam a vontade!
Enabling Wildcard in a collection at Watson Explorer
Eventually we need to enable search using wildcards like * for a collection at Watson Explorer. For sure this can make our queries consume more CPU and Memory, you can think comparing a query that perform a “select … where field = ‘XXX'” against a query that perform a “select …. where field like ‘*XXX'” (pseudo code). What will be faster? So, think carefully before enable this!
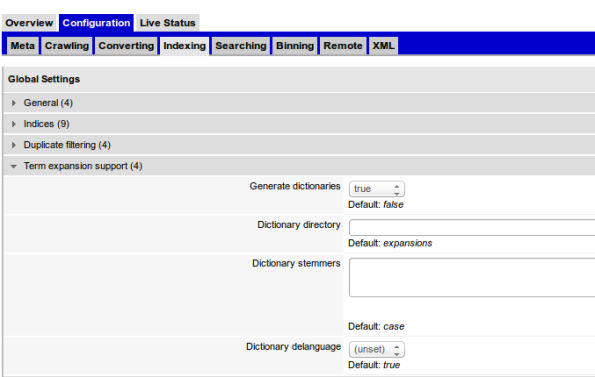
To enable, go to your collection configuration -> Indexing -> Term expansion support (4) , and check Generate Dictionaries.
For more information, check here and here.
Enjoy!
Passo a passo para a criação de uma aplicação híbrida para IPhone e Android
Criei uma apresentação com o passo a passo para a criação de uma aplicação híbrida para IPhone e Android, utilizando o framework Ionic (Angular + Cordova + Bootstrap).
Nela, iremos criar uma simples aplicação que se conecta em um feed Json do WordPress e lista os posts deste blog. Iremos testar no navegador e no Android. Eis a apresentação.
Para quem quer ver um pouco mais sobre os conceitos antes de partir para esta implementação, veja meu post anterior, que contém esta apresentação:
FindBugs x Checkstyle x PMD
 Inúmeras pessoas fazem a comparação entre as ferramentas FindBugs, Checkstyle e PMD. Vale dizer que as três permitem a escrita de um melhor código fonte, o inspecionando em busca de possíveis problemas e gerando relatórios para que o desenvolvedor possa tomar providências.
Porém, a abordagem delas é um pouco distinta:
- FindBugs: Funciona procurando padrões de Bugs. Analise o Bytecode, e não o código fonte em si. Funciona como se tivesse um banco de dados interno com os bugs comuns, e vasculha seu código procurando por esses bugs. Eventualmente pode dar falsos positivos, apontando erros que no contexto de sua aplicação, não são erros. A própria documentação oficial do Findbugs diz: “In practice, the rate of false warnings reported by it is less than 50%”.
http://findbugs.sourceforge.net/index.html - CheckStyle: Seu foco é em problemas relacionados as convenções e padrões Java, por exemplo: ausência de Java docs, abertura de chaves { depois de Ifs, etc. Ele varre o código fonte de seu projeto.
http://checkstyle.sourceforge.net/ - PMD: Vasculha o código fonte procurando por más práticas e problemas de código por exemplo: import com *, muitos métodos em classes, etc.
http://pmd.sourceforge.net/
Em geral o PMD e o Checkstyle são mais similares. Todavia, eu recomendo o uso das 3 ferramentas em seu projeto, e além disso, que sejam criados arquivos de configurações para CADA ferramente e que os mesmos sejam utilizados por TODO o time, garantindo assim, a homogeneidade na produção do seu código fonte.
O uso principalmente do checkstyle e do PMD garantem um código fonte mais legível, de melhor manutenabilidade, tornando-se o trabalho com os mesmos mais eficiente e rápido.
Eu fiz video aulas introdutórias sobre as 3 ferramentas, que ensinam como instalar, configurar e utilizar, como sempre, de maneira simples e objetiva. Seguem os links:
Enjoy!
Introdução ao Checkstyle
![]() O Checkstyle é uma ferramenta que auxilia desenvolvedores efetuando varredura de código fonte buscando por problemas, normalmente relacionados a convenções e padrões, como por exemplo: ausência de javadoc, parenteses desnecessários, etc.
O Checkstyle é uma ferramenta que auxilia desenvolvedores efetuando varredura de código fonte buscando por problemas, normalmente relacionados a convenções e padrões, como por exemplo: ausência de javadoc, parenteses desnecessários, etc.
Utilizando o mesmo e estando atendo a suas recomendações, certamente se obtém uma melhoria em seu código fonte, tornando-o mais legível e aumentando sua manutenabilidade.
Recomendo a todos os desenvolvedores que o utilizem em conjunto o o FindBugs e com o PMP, pois são ferramentas com finalidades parecidas e garantem juntas um sólido código fonte. Neste post, você pode encontrar mais informações sobre o FindBugs.
No vídeo abaixo, você pode ver facilmente como instalar e utilizar o checkstyle. Os slides utilizados no vídeo estão aqui.
Enjoy!

