Arquivo
Adding a scheduled task to Cron at Linux
Lets suppose that you have to run some task (a script for example) called test.sh every day at 6 and 12. You can use Linux Cron to schedule it.
Enter the command crontab -e to edit your cron schedule, then, add the lines:
00 6 * * * //test.sh
00 12 * * * //test.sh
Then, just save the file and voilà!
Cron its very flexible, you can configure minutes, seconds, days, months and years, and create complex schedules!
Enjoy!
Process check script for Linux
Sometimes I need to keep checking the some process is running in my servers. So, I created the following script and add it to Crontab. If I have problems, Ill receive an email.
This can be useful to someone!
In my example, Im searching for a process called zookeeper.
#!/bin/bash
SERVER="PROD 134"
ZK=`ps aux | grep zookeeper | grep -v "grep" | wc -l`

if [ $ZK -ge 1 ]
   then
        echo "ZK is Running"
   else
        echo "ZK is not Running" | mail -s "Zookeeper is not running - $SERVER" myemail@br.ibm.com
fi
Disk Space script for Linux
Sometimes I need to keep checking the disk space at my servers. So, I created the following script and add it to Crontab. If I have problems, Ill receive an email.
This can be useful to someone!
#!/bin/bash
# In my case im interested in a specific partition /opt/XYZ
SPACE=`df -h | grep /opt/XYZ | awk '{print $4}' | awk -F % '{print $1}'`

case $SPACE in
        9[1-9])
        echo "Disk space > 90 %, please check" | mail -s "Disk Space problem" email1@br.ibm.com,email2@br.ibm.com;;
        100)
        echo "Disk Full, please check" | mail -s "DISK FULL" email1@br.ibm.com,email2@br.ibm.com;;
esac
Creating a collection in IBM Watson Explorer crawling from Database
Perform a database Craw from a collection its something very common. With IBM Watson Explorer this is something very easy to do. In my example, Ill create a collection and will perform a simple query in a IBM DB2 database, but, the steps will be very similar for other databases, you just need to keep in mind that you will need the correct driver.
1- Put the driver in place:
Get the database jdbc and put in the correct folder, usually it is something like /opt/IBM/dataexplorer/WEX-11_0_2/Engine/lib/java/database/.
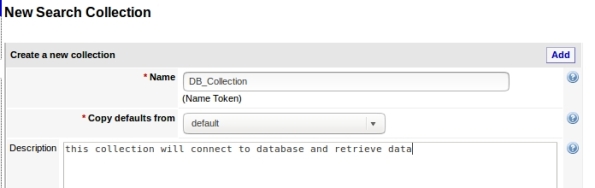
2- Create the collection copying defaults from default:
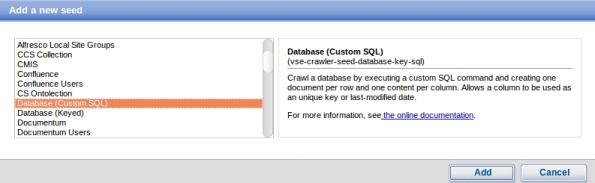
3- Add a new seed, this is where your collection will get data:

4- Choose Database:
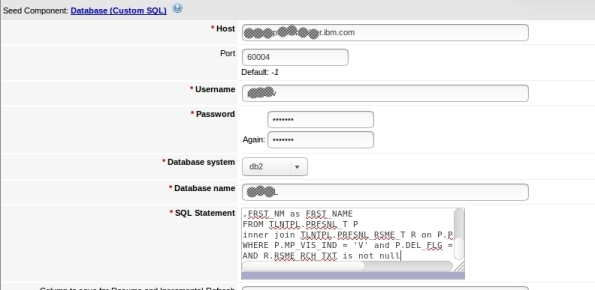
5- Enter your database settings and the query that will be performed:
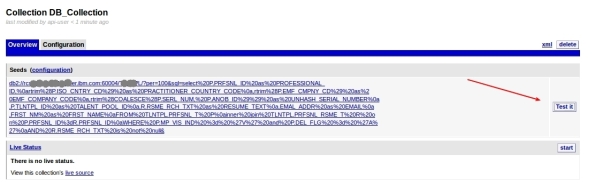
6- Its done, now you can test:
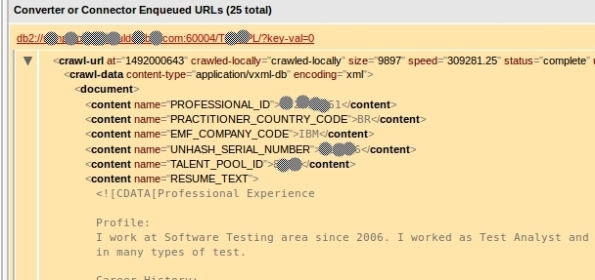
7- This can take a while depending on your query and connection, but when it finish, it will show some rows that the query returned in the following format. To see some row data, click Crawler XML:
8- Here is your data:
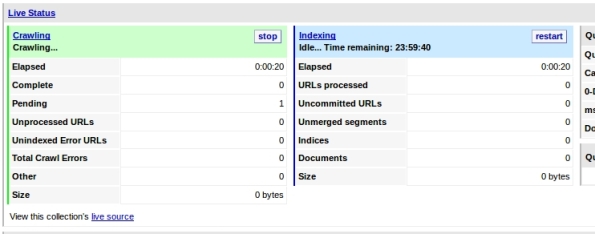
9- Now that we see that its working, you can start your craw. This step will feed your collection and can take a good time depending on your amount of data:

10-You must see Craw activity:
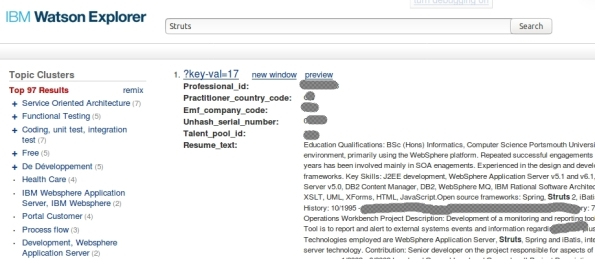
11- You can query your collection now to test, just enter your term and click search in the left options:
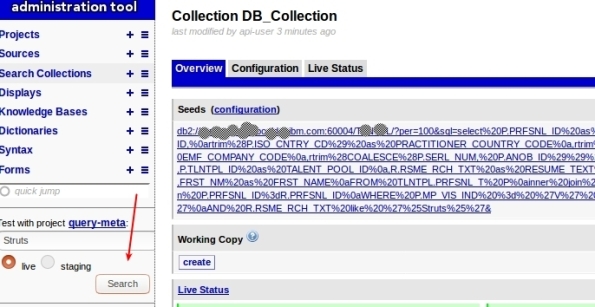
12- You will see something like this:
Thats it, you have created a collection that get data from Database!
Training your ontolections at IBM Watson Explorer
Ontolection Trainer its a nice stuff that people who are using ontolections to Improve the Queries at Watson Explorer need to know. This utility help us to analyze text body and create Thesaurus files, that can be used to create ontolections. Also, you can extract key-phrases or Acronyms that you can use with query-modifier and at some ontolection.
If you don’t know NLQ capabilities at Watson Explorer (WEX) or don’t know what is a Ontolection, I recommend that you read my 2 posts:
Backing to Ontolection Trainer, at NLQ folder (/opt/IBM/dataexplorer/WEX-11_0_2/Engine/nlq in my case) from your WEX installation (since rel 11.0.1), you can find the jar file ontolectiontrainer.jar. Obviously you will need Java to run it. Make sure that the JAVA from WEX installation are configured at your path.
The utility have several arguments, but, the basics are:
- the type of extraction
- the corpus that you will use: The corpus are your text file. In my case, I have a file with 1000 Resumes that Ill use to train WEX (RESUME_TEXT_1000.TXT ).
- the pear file: Pear file consist in the dictionary that the trainer will user to extract terms.
- the output path: Where it will create the file.
I have used a file called blacklist containing the words that I want to be ignored.
You can have problems with CPU and Memory utilization, for this cases, there are parameters to setup the number of iterations that trainer will do.
To be very objective, here is my commands:
- To extract the ontolection:
java -jar ontolectiontrainer.jar –trainOntolection –corpus RESUME_TEXT_1000.TXT –pear /opt/IBM/dataexplorer/WEX-11_0_2/Engine/data/pears/en.pear –blacklist blacklist –outputPath generatedOntolection_1000
- To extract Acronyms:
java -jar ontolectiontrainer.jar –extractAcronyms –corpus RESUME_TEXT_1000.TXT –pear /opt/IBM/dataexplorer/WEX-11_0_2/Engine/data/pears/en.pear –blacklist blacklist –outputPath generatedOntolectionAcronyms_1000
- To extract Phrases:
java -jar ontolectiontrainer.jar –learnPhrases –corpus RESUME_TEXT_1000.TXT –pear /opt/IBM/dataexplorer/WEX-11_0_2/Engine/data/pears/en.pear –blacklist blacklist –outputPath generatedOntolectionPhrases_1000
For more reference:
Enjoy.
Improving your queries at Watson Explorer using Ontolections
A good approach to enrich your queries at Watson Explorer its use Ontolections. A ontolection provides a set of related terms that are specific to the domain of an application or enterprise, and identifies the relationships between them. Basically, Wex Engine query the ontolection with the query terms, then, add this terms to the final query, and then, query your original collection.
For example: lets suppose that you have a synonym configured as: ALM → Application Lyfecycle Management. If user search for ALM, WEX engine will search also for Application Lyfecycle Management.
A ontolection can have also more than synonyms, we can have related terms, rewrite, spelling, etc. I recommend start with synonyms, then, improve your ontolection.
The first step to start playing with ontolections is create a Thesaurus file. This file will be used to create the ontolection. You can generate a thesaurus from several ways. The most common is create your own XML file manually, but, you can use something called Ontolection Trainer (Ill show how to use in the next posts).
For my example, I have created the following ontolection, it is called practitioner2.xml:
<?xml version="1.0" encoding="utf-8" ?>
<thesaurus name="practitioner1" language="english" domain="general">
<word name=".NET">
<synonym>.Net development</synonym>
<synonym>.Net<span style="font-family: Droid Sans Fallback;"><span style="font-size: small;"><span lang="zh-CN">開発</span></span></span></synonym>
<synonym>.NET<span style="font-family: Droid Sans Fallback;"><span style="font-size: small;"><span lang="zh-CN">開発</span></span></span></synonym>
</word>
<word name="Virtual Private Network">
<synonym>VPN</synonym>
<synonym><span style="font-family: Droid Sans Fallback;"><span style="font-size: small;"><span lang="zh-CN">バーチャル プライベート ネットワーク</span></span></span></synonym>
</word>
<word name="DNS">
<synonym>Domain Name Service</synonym>
<synonym><span style="font-family: Droid Sans Fallback;"><span style="font-size: small;"><span lang="zh-CN">ドメインネーム・サービス</span></span></span></synonym>
<synonym><span style="font-family: Droid Sans Fallback;"><span style="font-size: small;"><span lang="zh-CN">ドメインネームサービス</span></span></span></synonym>
</word>
</thesaurus>
Using this as an example, if user search for DNS, Ill also search for Domain Name Services.
After create your thesaurus file, you need to create a new collection at your WEX Server. Select generic-ontolection at Copy defaults from:
Then, add a new seed, pointing to the thesaurus file, in my case, I select FILES and add /opt/IBM/dataexplorer/WEX-11_0_1/Engine/nlq/practitioner2.xml
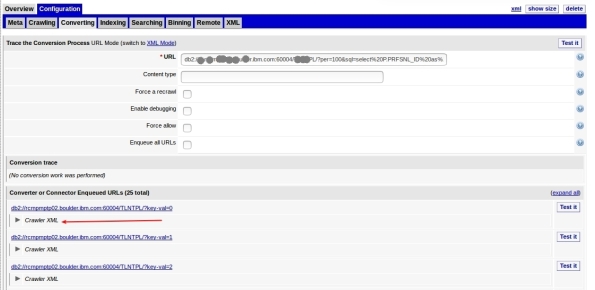
Go to collection overview → Configuration → Converting, click edit and set the values as:
Finally, go to Overview and Click Start at Live Status (you can also test before start). You will see Craw and Index running, and Documents being added.
Thats it, your ontolection is ready to use. You can test at your application and at WEX query utility. Here is a simple REST call using my ontolection, see that I’m searching for DNS and automatically WEX will search also for Domain Name Service | ドメインネーム・サービス | ドメインネームサービス.
http://MY_SERVER:9080/vivisimo/cgi-bin/velocity?v.app=api-rest&v.username=MY_USER&v.password=MY_PASSWORD&v.indent=true&v.function=query-search&fetch-timeout=30000&output-display-mode=limited&arena=MY_ARENA&output-contents-mode=list&syntax-operators=and or () CONTAINING CONTENT %field%: + NEAR – NOT NOTCONTAINING NOTWITHIN OR0 quotes regex stem THRU BEFORE FOLLOWEDBY weight wildcard wildchar WITHIN WORDS site less-than less-than-or-equal greater-than greater-than-or-equal equal range&sources=MY_COLLECTION &output-contents=FIELD1 FIELD2&output-bold-contents=FIELD1 FIELD2&query=dns&query-condition-xpath=$FIELD3=’XXXXX’&query-object=&num-per-source=20&start=0&num=20&query-modification-macros=query-modification-expansion&extra-xml=<declare name=”query-expansion.enabled” /><set-var name=”query-expansion.enabled”>true</set-var><declare name=”query-expansion.user-profile” /><set-var name=”query-expansion.user-profile”>on</set-var><declare name=”query-expansion.ontolections” /><set-var name=”query-expansion.ontolections”>onto_practitioner</set-var><declare name=”query-expansion.max-terms-per-type” /><set-var name=”query-expansion.max-terms-per-type”>3</set-var><declare name=”query-expansion.automatic” /><set-var name=”query-expansion.automatic”>synonym:0.8,alternative:0.8,spelling:0.8,narrower:0.5,translation:0.5,broader:0.5,related:0.5</set-var><declare name=”query-expansion.suggestion” /><set-var name=”query-expansion.suggestion”></set-var><declare name=”query-expansion.query-match-type” /><set-var name=”query-expansion.query-match-type”>terms</set-var><declare name=”query-expansion.conceptual-search-similarity-threshold” /><set-var name=”query-expansion.conceptual-search-similarity-threshold”>0.1</set-var><declare name=”query-expansion.conceptual-search-metric” /><set-var name=”query-expansion.conceptual-search-metric”>euclidean-dot-product</set-var><declare name=”query-expansion.conceptual-search-candidates-max” /><set-var name=”query-expansion.conceptual-search-candidates-max”>euclidean-dot-product</set-var><declare name=”query-expansion.conceptual-search-sources” /><set-var name=”query-expansion.conceptual-search-sources”>MY_COLLECTION </set-var><declare name=”query-expansion.stem-expansions” /><set-var name=”query-expansion.stem-expansions”>false</set-var><declare name=”query-expansion.stemming-dictionary” /><set-var name=”query-expansion.stemming-dictionary”>english/wildcard.dict</set-var><declare name=”reporting.track-spelling” /><set-var name=”reporting.track-spelling”>false</set-var><declare name=”meta.stem-expand-stemmer” /><set-var name=”meta.stem-expand-stemmer”>delanguage+english+depluralize</set-var><declare name=”query-expansion.stemming-weight” /><set-var name=”query-expansion.stemming-weight”>0.8</set-var>
See that this parameter turn on the ontolection:
&query-modification-macros=query-modification-expansion
And at &extra-xml I have some specific settings.
Special attention to where I use onto_practitioner, use your ontolection name.
Also, pay attention that if you have more than one server or shards, settings can change.
Calling this REST API, analysing results you will see some output like:
<op-exp logic=”or” middle-string=”OR” name=”OR” precedence=”2″><term field=”query” input-type=”user” processing=”strict” str=”dns”/><term field=”query” relation=”synonym” str=”Domain Name Service”/><term field=”query” relation=”synonym” str=”ドメインネーム・サービス”/><term field=”query” relation=”synonym” str=”ドメインネームサービス”/></op-exp>
If you would like to test at WEX query utility, you should edit the project query-meta and add the following flags:
Enable query stopword removal → true
Query expansion match type→ Terms
Enable semantic expansion → true
And set the configurations like the following:
Thats it. Enjoy!
For more information about ontolection: http://www.ibm.com/support/knowledgecenter/en/SS8NLW_11.0.1/com.ibm.swg.im.infosphere.dataexpl.engine.tut.cs.doc/c_csearch-ontolection-tut.html

