Arquivo
Watson Explorer Content Analytics installation – Steps
I installed Watson Explorer Content Analytics several times in the last months, then, I created a simple Step by step that can be useful to who is starting to work with this. I’m sharing here, please, fell free to add any comment and help me to improve this how-to. Hope that can be useful to you if you are here :D.
Pre-Installation Checklist / Pre-requisites
The following steps should be performed to prepare the server for software installation. This step by step cover the installation in a Red Hat 7 machine. The following 32-bit libraries are required on Linux x86-64 systems:
- libstdc++33 (compat-libstdc++-33.i686 / libstdc++33-32bit)
- libstdc++ (libstdc++.i686 / libstdc++6-32bit)
- zlib (zlib.i686 / libz1-32bit / zlib-32bit)
- libXext (libXext.i686 / libXext6-32bit / xorg-x11-libXext-32bit)
- libXft (libXft.i686 / libXft2-32bit / xorg-x11-libs-32bit)
- libXi (libXi.i686 / libXi6-32bit / xorg-x11-libs-32bit)
- libXp (libXp.i686 / libXp6-32bit / xorg-x11-libXp-32bit)
- libXtst (libXtst.i686 / libXtst6-32bit / xorg-x11-libs-32bit)
- libXm (if thumbnails are needed)
- libXt (if thumbnails are needed)
- java-1.8.0-ibm-1.8.0.2.10-1jpp.7.el6.x86_64
- Httpd
The commands to install the libraries are:
- yum install -y libstdc++.i686 libXext.i686 libXft.i686 libXi.i686 libXp.i686 libXtst.i686 libXt.i68
- yum install -y zlib.i686 httpd
- yum -y install apr apr-util boost-filesystem boost-iostreams boost-program-options boost-regex boost-serialization
-
If SELinux is enabled, then it will need to be disabled during installation of WEX
-
Ensure that the disk space has been allocated to the WEX installation path
-
The default path is /opt/ibm/dataexplorer
-
Ensure that the disk space for /tmp partition have sufficient space for the installation, at least 10 gb
If not assign the tmp to a directory that has extra space with the commands:
- mkdir /opt/IBM/dataexplorer/tmp
- export IATEMPDIR=/opt/IBM/dataexplorer/tmp
-
Install a web server to run the Foundational Components -> On Linux install the latest version of Apache (not required for AC)
-
Ensure that the LINUX subscription libraries are available for the yum command
-
DB2 connect client configured
-
Install Java – java-1.8.0-ibm-1.8.0.2.10-1jpp.7.el6.x86_64 (you can get the package from oracle also, make sure to add Java to the server path)
Users and Folders creation for WEX AE (must be perform with root level access)
- Add installation account (esadmin) for server install.
- useradd esadmin
- create a password for the esadmin user (usually esadmin12)
- Create Watson Directories
- mkdir -p /watson/archives
- Copy the installation tarball onto the server into.
- Untar the tarball that contains installation files.mkdir /opt/IBM/dataexplorer/WATSON_EXPR_ADV_EAC_V11.0.2_LNX_M
cd /opt/IBM/dataexplorer /WATSON_EXPR_ADV_EAC_V11.0.2_LNX_M
tar -xvf ./watson/archives/WATSON_EXPR_ADV_EAC_V11.0.2_LNX_M.tar
WEX AE Installation Details:
- (Note must be performed with root level access) Install the software. (Note: Responses for Master node when selecting server type)
-
- cd /opt/IBM/dataexplorer/WATSON_EXPR_ADV_EAC_V11.0.2_LNX_M/
- ./install.bin -i console
- Installation Responses: (Also see installation screenshots below)
- Choose Locate : English
- PRESS TO CONTINUE:
- Press Enter to continue view license agreement or 1 to accept: 1 (accept)
- Enter fully qualified hostname of this server: (Hostname will be detected, hit enter. see example below)
-
- Administrator user name: (Default: esadmin): (Hit enter to take default)
-
- Create user account Enter the Number for your choice..: 2 ( the administrator user account ‘esadmin’ already exists)
-
- Enter Administrator Account password: your_esadmin_password that you created for the user earlier (esadmin12)
-
- Select a Server Type: (Response depends on type of server being installed on)
- (1 –Master all on one server )
- Select a Server Type: (Response depends on type of server being installed on)
If installation is consists of a single server.
-
-
- (2 -Master Distributed Server )
-
If installation consists of multiple servers, and the current server is the Master server
-
-
- (3 -Additional Server )
-
If the installation is for a server (ie.. Search Server) that will connect to a Master
Select: 1
-
- Do you want to install advanced options: 1 (YES)
- Enter absolute path of the data directory ES_NODE_ROOT (default: /opt/IBM/dataexplorer/esdata ) /opt/IBM/dataexplorer/esdata
- Enter the absolute path to install : /opt/IBM/dataexplorer/es
-
- Common Communication Layer Port (default: 6002) Hit enter for the default
-
- Search Server ESSearchServer Port (default: 8394) Hit enter for the default
-
- Web Application Server (default embedded) 1 –embedded
-
- Enterprise Search Application and Content Analytics Miner Port (default 8393) Hit enter for the default
-
- THE INSTALLATION WILL BEGIN AND RUN ABOUT 5-10 MINUTES
- THE INSTALLATION WILL BEGIN AND RUN ABOUT 5-10 MINUTES
…
-
- This completes the WAC (Watson Content Analytic) installation
- You can start esadmin to test:
- /opt/IBM/es/bin/esadmin system startall
- Go to admin console and check:
- http://:8390/ESAdmin/
Install SIRE (Statistical Information and Relation Extraction) module
1. Stop esadmin – /opt/IBM/es/bin/esadmin system stopall
2. Iinstall the pre-req libraries:
yum -y install apr apr-util boost-filesystem boost-iostreams boost-program-options boost-regex boost-serialization
- go to /opt/IBM/dataexplorer/es/bin/sire and run
rpm -ivh sire-20161109-1.x86_64.rpm
- Stop esadmin – /opt/IBM/es/bin/esadmin system stopall
- Start esadmin – /opt/IBM/es/bin/esadmin system startall
- Installation is complete
Uninstall Notes
To Uninstall the WAC application (Note must be performed with root access), switch to root level account and perform the command:
/opt/IBM/dataexplorer/es/uninstall_11.0.1.0./uninstall_11.0.1.0 -i console
WEX AE System Start-up / Shutdown
To stop the services:
- /opt/IBM/es/bin/esadmin system stopall
To start the services:
- opt/IBM/es/bin/startccl.sh -bg
- /opt/IBM/es/bin/esadmin system start
- /opt/IBM/es/bin/esadmin system startall
Creating a collection in IBM Watson Explorer crawling from Database
Perform a database Craw from a collection its something very common. With IBM Watson Explorer this is something very easy to do. In my example, Ill create a collection and will perform a simple query in a IBM DB2 database, but, the steps will be very similar for other databases, you just need to keep in mind that you will need the correct driver.
1- Put the driver in place:
Get the database jdbc and put in the correct folder, usually it is something like /opt/IBM/dataexplorer/WEX-11_0_2/Engine/lib/java/database/.
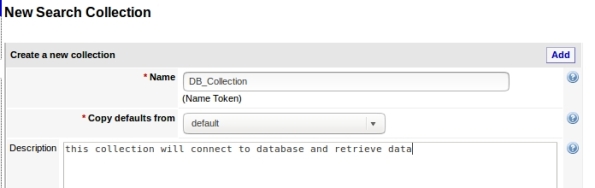
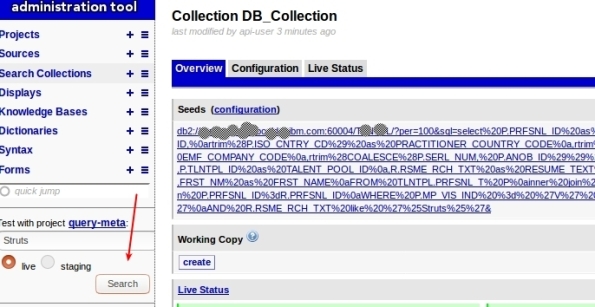
2- Create the collection copying defaults from default:
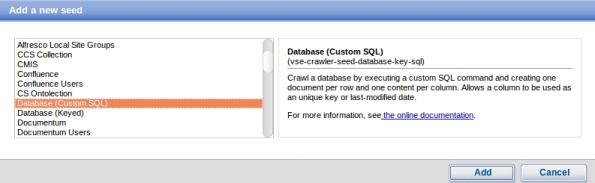
3- Add a new seed, this is where your collection will get data:

4- Choose Database:
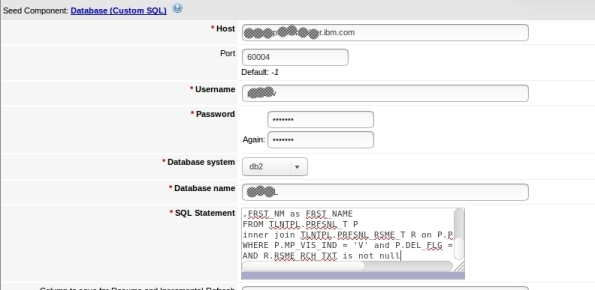
5- Enter your database settings and the query that will be performed:
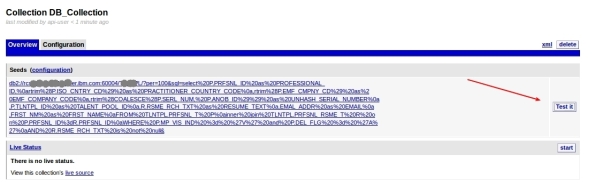
6- Its done, now you can test:
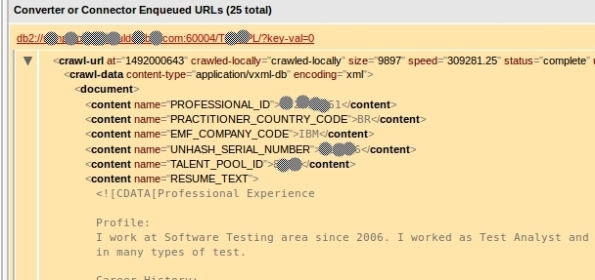
7- This can take a while depending on your query and connection, but when it finish, it will show some rows that the query returned in the following format. To see some row data, click Crawler XML:
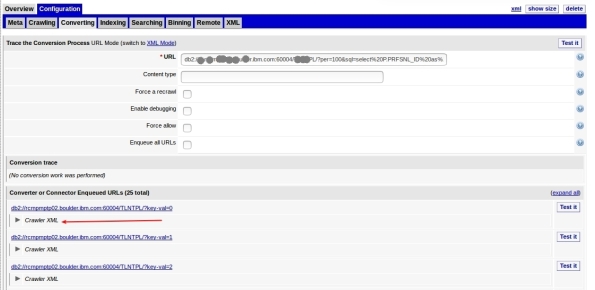
8- Here is your data:
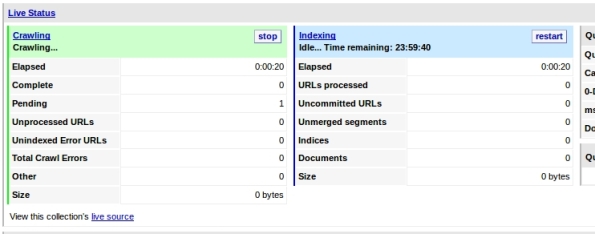
9- Now that we see that its working, you can start your craw. This step will feed your collection and can take a good time depending on your amount of data:

10-You must see Craw activity:
11- You can query your collection now to test, just enter your term and click search in the left options:
12- You will see something like this:
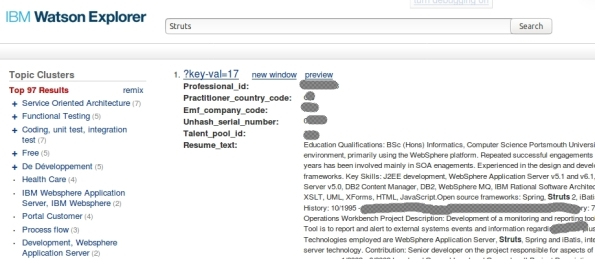
Thats it, you have created a collection that get data from Database!
Training your ontolections at IBM Watson Explorer
Ontolection Trainer its a nice stuff that people who are using ontolections to Improve the Queries at Watson Explorer need to know. This utility help us to analyze text body and create Thesaurus files, that can be used to create ontolections. Also, you can extract key-phrases or Acronyms that you can use with query-modifier and at some ontolection.
If you don’t know NLQ capabilities at Watson Explorer (WEX) or don’t know what is a Ontolection, I recommend that you read my 2 posts:
Backing to Ontolection Trainer, at NLQ folder (/opt/IBM/dataexplorer/WEX-11_0_2/Engine/nlq in my case) from your WEX installation (since rel 11.0.1), you can find the jar file ontolectiontrainer.jar. Obviously you will need Java to run it. Make sure that the JAVA from WEX installation are configured at your path.
The utility have several arguments, but, the basics are:
- the type of extraction
- the corpus that you will use: The corpus are your text file. In my case, I have a file with 1000 Resumes that Ill use to train WEX (RESUME_TEXT_1000.TXT ).
- the pear file: Pear file consist in the dictionary that the trainer will user to extract terms.
- the output path: Where it will create the file.
I have used a file called blacklist containing the words that I want to be ignored.
You can have problems with CPU and Memory utilization, for this cases, there are parameters to setup the number of iterations that trainer will do.
To be very objective, here is my commands:
- To extract the ontolection:
java -jar ontolectiontrainer.jar –trainOntolection –corpus RESUME_TEXT_1000.TXT –pear /opt/IBM/dataexplorer/WEX-11_0_2/Engine/data/pears/en.pear –blacklist blacklist –outputPath generatedOntolection_1000
- To extract Acronyms:
java -jar ontolectiontrainer.jar –extractAcronyms –corpus RESUME_TEXT_1000.TXT –pear /opt/IBM/dataexplorer/WEX-11_0_2/Engine/data/pears/en.pear –blacklist blacklist –outputPath generatedOntolectionAcronyms_1000
- To extract Phrases:
java -jar ontolectiontrainer.jar –learnPhrases –corpus RESUME_TEXT_1000.TXT –pear /opt/IBM/dataexplorer/WEX-11_0_2/Engine/data/pears/en.pear –blacklist blacklist –outputPath generatedOntolectionPhrases_1000
For more reference:
Enjoy.
Improving your queries at Watson Explorer using Ontolections
A good approach to enrich your queries at Watson Explorer its use Ontolections. A ontolection provides a set of related terms that are specific to the domain of an application or enterprise, and identifies the relationships between them. Basically, Wex Engine query the ontolection with the query terms, then, add this terms to the final query, and then, query your original collection.
For example: lets suppose that you have a synonym configured as: ALM → Application Lyfecycle Management. If user search for ALM, WEX engine will search also for Application Lyfecycle Management.
A ontolection can have also more than synonyms, we can have related terms, rewrite, spelling, etc. I recommend start with synonyms, then, improve your ontolection.
The first step to start playing with ontolections is create a Thesaurus file. This file will be used to create the ontolection. You can generate a thesaurus from several ways. The most common is create your own XML file manually, but, you can use something called Ontolection Trainer (Ill show how to use in the next posts).
For my example, I have created the following ontolection, it is called practitioner2.xml:
<?xml version="1.0" encoding="utf-8" ?>
<thesaurus name="practitioner1" language="english" domain="general">
<word name=".NET">
<synonym>.Net development</synonym>
<synonym>.Net<span style="font-family: Droid Sans Fallback;"><span style="font-size: small;"><span lang="zh-CN">開発</span></span></span></synonym>
<synonym>.NET<span style="font-family: Droid Sans Fallback;"><span style="font-size: small;"><span lang="zh-CN">開発</span></span></span></synonym>
</word>
<word name="Virtual Private Network">
<synonym>VPN</synonym>
<synonym><span style="font-family: Droid Sans Fallback;"><span style="font-size: small;"><span lang="zh-CN">バーチャル プライベート ネットワーク</span></span></span></synonym>
</word>
<word name="DNS">
<synonym>Domain Name Service</synonym>
<synonym><span style="font-family: Droid Sans Fallback;"><span style="font-size: small;"><span lang="zh-CN">ドメインネーム・サービス</span></span></span></synonym>
<synonym><span style="font-family: Droid Sans Fallback;"><span style="font-size: small;"><span lang="zh-CN">ドメインネームサービス</span></span></span></synonym>
</word>
</thesaurus>
Using this as an example, if user search for DNS, Ill also search for Domain Name Services.
After create your thesaurus file, you need to create a new collection at your WEX Server. Select generic-ontolection at Copy defaults from:
Then, add a new seed, pointing to the thesaurus file, in my case, I select FILES and add /opt/IBM/dataexplorer/WEX-11_0_1/Engine/nlq/practitioner2.xml
Go to collection overview → Configuration → Converting, click edit and set the values as:
Finally, go to Overview and Click Start at Live Status (you can also test before start). You will see Craw and Index running, and Documents being added.
Thats it, your ontolection is ready to use. You can test at your application and at WEX query utility. Here is a simple REST call using my ontolection, see that I’m searching for DNS and automatically WEX will search also for Domain Name Service | ドメインネーム・サービス | ドメインネームサービス.
http://MY_SERVER:9080/vivisimo/cgi-bin/velocity?v.app=api-rest&v.username=MY_USER&v.password=MY_PASSWORD&v.indent=true&v.function=query-search&fetch-timeout=30000&output-display-mode=limited&arena=MY_ARENA&output-contents-mode=list&syntax-operators=and or () CONTAINING CONTENT %field%: + NEAR – NOT NOTCONTAINING NOTWITHIN OR0 quotes regex stem THRU BEFORE FOLLOWEDBY weight wildcard wildchar WITHIN WORDS site less-than less-than-or-equal greater-than greater-than-or-equal equal range&sources=MY_COLLECTION &output-contents=FIELD1 FIELD2&output-bold-contents=FIELD1 FIELD2&query=dns&query-condition-xpath=$FIELD3=’XXXXX’&query-object=&num-per-source=20&start=0&num=20&query-modification-macros=query-modification-expansion&extra-xml=<declare name=”query-expansion.enabled” /><set-var name=”query-expansion.enabled”>true</set-var><declare name=”query-expansion.user-profile” /><set-var name=”query-expansion.user-profile”>on</set-var><declare name=”query-expansion.ontolections” /><set-var name=”query-expansion.ontolections”>onto_practitioner</set-var><declare name=”query-expansion.max-terms-per-type” /><set-var name=”query-expansion.max-terms-per-type”>3</set-var><declare name=”query-expansion.automatic” /><set-var name=”query-expansion.automatic”>synonym:0.8,alternative:0.8,spelling:0.8,narrower:0.5,translation:0.5,broader:0.5,related:0.5</set-var><declare name=”query-expansion.suggestion” /><set-var name=”query-expansion.suggestion”></set-var><declare name=”query-expansion.query-match-type” /><set-var name=”query-expansion.query-match-type”>terms</set-var><declare name=”query-expansion.conceptual-search-similarity-threshold” /><set-var name=”query-expansion.conceptual-search-similarity-threshold”>0.1</set-var><declare name=”query-expansion.conceptual-search-metric” /><set-var name=”query-expansion.conceptual-search-metric”>euclidean-dot-product</set-var><declare name=”query-expansion.conceptual-search-candidates-max” /><set-var name=”query-expansion.conceptual-search-candidates-max”>euclidean-dot-product</set-var><declare name=”query-expansion.conceptual-search-sources” /><set-var name=”query-expansion.conceptual-search-sources”>MY_COLLECTION </set-var><declare name=”query-expansion.stem-expansions” /><set-var name=”query-expansion.stem-expansions”>false</set-var><declare name=”query-expansion.stemming-dictionary” /><set-var name=”query-expansion.stemming-dictionary”>english/wildcard.dict</set-var><declare name=”reporting.track-spelling” /><set-var name=”reporting.track-spelling”>false</set-var><declare name=”meta.stem-expand-stemmer” /><set-var name=”meta.stem-expand-stemmer”>delanguage+english+depluralize</set-var><declare name=”query-expansion.stemming-weight” /><set-var name=”query-expansion.stemming-weight”>0.8</set-var>
See that this parameter turn on the ontolection:
&query-modification-macros=query-modification-expansion
And at &extra-xml I have some specific settings.
Special attention to where I use onto_practitioner, use your ontolection name.
Also, pay attention that if you have more than one server or shards, settings can change.
Calling this REST API, analysing results you will see some output like:
<op-exp logic=”or” middle-string=”OR” name=”OR” precedence=”2″><term field=”query” input-type=”user” processing=”strict” str=”dns”/><term field=”query” relation=”synonym” str=”Domain Name Service”/><term field=”query” relation=”synonym” str=”ドメインネーム・サービス”/><term field=”query” relation=”synonym” str=”ドメインネームサービス”/></op-exp>
If you would like to test at WEX query utility, you should edit the project query-meta and add the following flags:
Enable query stopword removal → true
Query expansion match type→ Terms
Enable semantic expansion → true
And set the configurations like the following:
Thats it. Enjoy!
For more information about ontolection: http://www.ibm.com/support/knowledgecenter/en/SS8NLW_11.0.1/com.ibm.swg.im.infosphere.dataexpl.engine.tut.cs.doc/c_csearch-ontolection-tut.html
Implementing Natural Language Query with IBM Watson Explorer
If you have a Watson Explorer (WEX) collection and want to be able to handle with Natural Query Language, you need to know that since WEX release 11.0.1, it have a native component to handle with this – its the query-modifier service.
Basically, this service parse the queries and apply some strategies, transforming the query in Keywords that WEX can understand and apply in the queries. Lets suppose that user search is:
“I’m looking for a Java Developer that know Struts and Spring and work from Brazil.”
The service will extract the keywords, based on configurations, and will search for:
Java Developer + Struts + spring + Brazil
We need to keep in mind that NLQ is different from Cognitive. This service will not understand questions, it will just extract terms. If you are looking for cognitive, you are looking for Watson (https://www.ibm.com/watson/developercloud/). With Watson we can understand the text and apply filter using location, range, etc. This also can be done using Machine Learning Models created at Watson Knowledge studio. But, Ill talk about this soon.
Backing to Query-Modifier, if you look at the folder nlq, inside Engine folder from your WEX installation, you will find the configuration stuff. Query Modifier work this way:
You make a request to WEX telling that you will use QM, the request pass through QM that apply the strategies, then, it forward the request to WEX Engine, who respond to you.
Here is a simple REST call that is using query-modifier:
See that the following make WEX use Query Modifier:
&query-modification-macros=enhance-query-with-querymodifier
In order to configure, go to <your WEX install folder>/Engine/nlq , in my case /opt/IBM/dataexplorer/WEX-11_0_1/Engine/nlq
Run “chmod +x querymodifier-install.sh”
Then “./querymodifier-install.sh” (as root)
You will see this kind of output:
Copying /opt/IBM/dataexplorer/WEX-11_0_1/Engine/examples/nlq/querymodifier/querymodifier-production.yml.defaults to /opt/IBM/dataexplorer/WEX-11_0_1/Engine/nlq/querymodifier-production.yml…
Configuring port to 9080…
Configuring path to vivisimo/cgi-bin/velocity…
Configuring PEARs path to /opt/IBM/dataexplorer/WEX-11_0_1/Engine/data/pears…
Copying querymodifier-2.1.9.jar to /opt/IBM/dataexplorer/WEX-11_0_1/Engine/nlq/querymodifier.jar…
Giving executable permissions to /opt/IBM/dataexplorer/WEX-11_0_1/Engine/nlq/querymodifier.jar…
Removing any existing /etc/init.d/querymodifier…
Linking /etc/init.d/querymodifier to …
Done.
Its important to change owner of the created files to WEX instance owner, in my case dataexp, so, as root: chown -R dataexp: <your WEX install folder>/Engine/nlq/
The configuration file is called querymodifier-production.yaml
In the first part of the file, you will see the WEX server setting, like IP, port and user.
After this you can setup the strategies, in my case I have this setup:
#The strategies to apply, by default, to each query. Can also be customized on a per-request basis (“workplan” GET parameter):
strategies:
default: PhraseWhitelistStrategy POSBasedNoiseWordRemoverStrategy DictionaryBasedNoiseWordRemoverStrategy DisjunctifyStrategy
The first strategy it the Disjunctify. It converts AND operators into OR operators, if the operator has more terms than a threshold. For example, if you set minimumRequiredTerms = 4, if user search for less terms than 4, query will be (A AND B AND C AND D), if you search for more than 4 terms, query will be (A OR B OR C OR D OR X OR …..).
The Dictionary-Based Noiseword Removal strategy, basically remove words from the query. For example, if you add BANANA to the list, then if user search for BANANA, it will be ignored. Usually we add to this section the common STOPWORDS, you can find several lists, I recommend use the google one. Another good list is here.
The Phrase Whitelist Strategy its interesting, you can have some external config files for some keyphrases, for example, lets suppose that you want that “Project Manager” be searched and “Project Manager”, and not “Project” and “Manager”, so, you need to add this word in the config file.
We have a secret here: you need to separate the words with <TAB> instead of space, else it will not work.
After configure your strategies, you just need to start the service (usually /etc/init.d/query-modifier start) and perform the REST Calls to test. You can follow the log at /var/log/querymodifier.log.
Every time that you change this setting, you need to recycle query modifier.
Your best friend to help with development and test, its the Api Runner interface from WEX engine. You can access this at:
http://YOUR_SERVER:9080/vivisimo/cgi-bin/velocity?v.app=api-run&v.function=query-parse-querymodifier
See the parameters there and ENJOY!
For more references: http://www.ibm.com/support/knowledgecenter/SS8NLW_11.0.1/com.ibm.watson.wex.fc.nlq.doc/c_wex_adding_nlq.html
Introdução a Big Data e Apache Solr
Para quem está interessado em Big Data e além disso quer algo prático utilizando Apache Solr, disponibilizo um conjunto de slides que podem ser utilizados por Estudantes, Professores e profissionais. Usem e distribuam a vontade!
Field x Facet
Many people who start to work with Apache Solr or Watson Explorer have the first primary doubt about What is the difference from Field against Facet.
We can simple define that the field represent the indexed data, and the facet its such a GROUP, combined usually by volume. As described at Solr documentation “faceting is the arrangement of search results into categories based on indexed terms”.
Its possible to configure FACETS with many options like sort, searchable, etc. Each product have its possibilities.
Think that when you perform a query, you will use FACETs in the “Where”, something like this:
Select FIELDS from COLLECTION where FACET MY_FACET = ‘dummy’;
This will make you understand better!
Enjoy!
Enabling Wildcard in a collection at Watson Explorer
Eventually we need to enable search using wildcards like * for a collection at Watson Explorer. For sure this can make our queries consume more CPU and Memory, you can think comparing a query that perform a “select … where field = ‘XXX'” against a query that perform a “select …. where field like ‘*XXX'” (pseudo code). What will be faster? So, think carefully before enable this!
To enable, go to your collection configuration -> Indexing -> Term expansion support (4) , and check Generate Dictionaries.
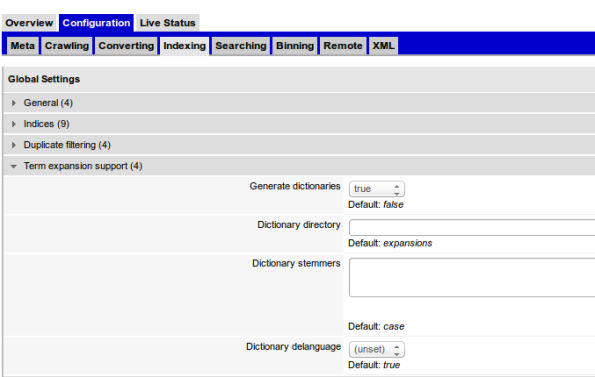
For more information, check here and here.
Enjoy!
Finding bottlenecks at Watson Explorer queries
If you are having problem with some Watson Explorer query, an excellent way to find bottlenecks is to perform the query with Debug and Profile options enabled, it will help you to find where exactly you have problems.
Usually, when you perform a query at WEX, you call some URL like the following (in my case port is 7205, MY_COLLECTION can be a shard, for example MY_COLLECTION_1_1):
<SERVER>:<PORT>/search?collection=MY_COLLECTION&query-xml=<%3fxml version%3d”1.0″ encoding%3d”UTF-8″%3f><operator logic%3d”and”%2f>&num=1&max=1&binning-mode=normal&start=0&show-duplicates=1&doc-axl=<%3fxml version%3d”1.0″ encoding%3d”UTF-8″%3f><document key-hash%3d”{vse%3adoc-hash()}”%2f>&binning-config=<%3fxml version%3d”1.0″ encoding%3d”UTF-8″%3f><binning-sets><binning-set bs-id%3d”VENDOR” logic%3d”or” max-bins%3d”8″ select%3d”%24VENDOR”%2f><binning-set bs-id%3d”REVENUE_USD_FACET” logic%3d”or” max-bins%3d”11″ select%3d”%24REVENUE_USD_FACET”%2f>……………field%3d”SERVICE_AREA”><field-to name%3d”SERVICE_AREA”%2f><%2ffield-map><field-map field%3d”MAX_IGS_REV_OM_BRAND_CD”><field-to name%3d”MAX_IGS_REV_OM_BRAND_CD”%2f><%2ffield-map><field-map field%3d”EMAIL_SENT”><field-to name%3d”EMAIL_SENT”%2f><%2ffield-map><field-map field%3d”REVENUE_USD_FACET”><field-to name%3d”REVENUE_USD_FACET”%2f><%2ffield-map><field-map field%3d”REVENUE”><field-to name%3d”REVENUE”%2f><%2ffield-map><field-map field%3d”CLIENT_NAME”><field-to name%3d”CLIENT_NAME”%2f><%2ffield-map><%2ffield-mapping>&sort-keys=1&score=1&shingles=0&summarize=0&gen-key=0&cache-data=0&force-binning=1&output-acls=1
If you don’t have IDEA about HOW to get the query that your Application is doing, you can enable Debug at your collection. Go to WEX console, under Configuration -> Searching -> Debugging and enable Query Logging.
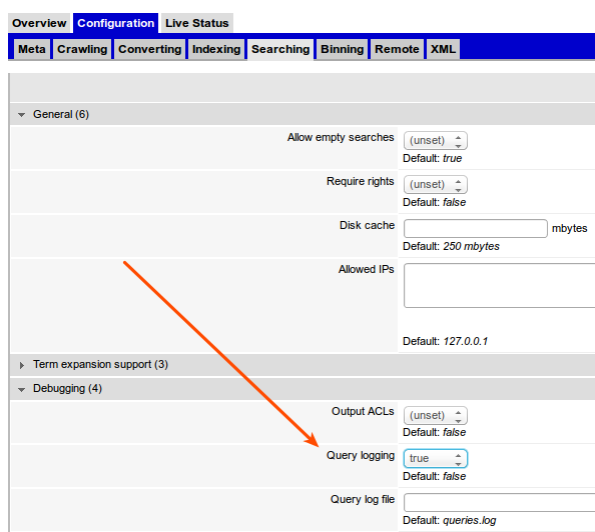
When saved, it will start to generate log in a file called queries.log, under you collection folder, some place like:
/opt/IBM/dataexplorer/WEX-11/Engine/data/search-collections/YYY/MY_COLLECTION/crawl1/
You can check it at WEX console, under your collection configuration, tab META, field Filebase.
Ok, now, if you call this URL from your browser, appending “&debug=1&profile=1″ to the URL, you will got a XML file. Download it and lets analyze. For our case, see this:
<xpath-performances>
<xpath-performance xpath=”($FIELD_X) = ‘GBS – No’ or ($FIELD_X) = ‘GBS – Yes'” slow-ms=”10295″ n-slow=”192000″ n-fast=”0″ n-direct=”0″ n-hashes=”1″ />
</xpath-performances>
THIS tell me that JUST in order to get the field FIELD_X, I’m having slow! (I’m my case it is because my Field its an Array)
So, probably I have a problem with this field, that can be a lot, for example:
1- Null values (see my other posts)
2- Its an array to index
3- Its a long text field
4- You have a lot of possible statements using it (OR, AND, WHERE, etc)
With this information, you can go to next step, that is find a way to change the field and make it work better.
Important: I tested this with Watson Explorer 9, 10 and 11. Running at Linux Machines.
Enjoy!
Watson Explorer performance decrease with null values
Working with Watson Explorer (WEX) we saw that the search performance decrease a lot when you have null values for some field/facet. (Our WEX release at this moment is 11, we run at Linux machines and our application was written in Java, using BigIndex to index and search. (Also have pure REST version of our application in test and the problem still happen)).
For example: lets suppose that you have a facet called VENDOR in an entity called Product. Suppose that you have 5 millions Products indexed and for some of then you have nulls, in my case 2 Millions have NULL values for VENDOR field.
In this case (and similar ones), we notice a performance decrease in searches. We start to see problems when the relation of null are greater than 20%.
In order to solve the problem we have 2 options:
1- One technique we’ve used for certain dimensions is to always ensure non-null values in the index — so at index time, we either coalesce in our SQL pulls from DB2 or do transformation after ingestion to replace nulls with some predefined value. In our case we use the literal string “(no value available)”. It: a) ensures non-null values, b) is fairly meaningful to users, and c) gives users a way to actually filter on those records if needed.
2- For some FIELDS, we can not add another values, must leave null (Business reasons) and must not show null option to user select in the facet. In this case, in the moment of search we append boolean($FIELD) to the query. For example:

