Usando Selenium WebDriver com Java – exemplo simples
Sempre preciso criar códigos para utilizarem o Selenium Webdriver com a finalidade de simular alguma ação e efetuar testes, então resolvi criar um exemplo para reutilizar e expandir sempre que necessário.
Para quem não conhece, de forma muito simplificada, podemos dizer que o Selenium é um utilitário que nos permite gravar/criar cenários de testes e os rodar, contando com poderosas estruturas tais como checagens de resultados (asserts), loops, cargas, etc.
O Selenium WebDriver basicamente permite que criemos estes cenários de testes, e os rodemos de uma aplicação. Ele suporta Java, Ruby, Python, etc.
Como falei, a descrição acima é muito simplista, pois meu foco aqui é demonstrar com as mãos na massa como criar um projeto Java e rodar um teste que vai simular a abertura da pagina do google e uma pesquisa. Vamos lá:
- Crie um projeto Maven Java
- Adicione as dependências do Selenium (seu Pom.xml deve ficar parecido com o codigo abaixo)
<project xmlns="http://maven.apache.org/POM/4.0.0" xmlns:xsi="http://www.w3.org/2001/XMLSchema-instance" xsi:schemaLocation="http://maven.apache.org/POM/4.0.0 http://maven.apache.org/xsd/maven-4.0.0.xsd">
<modelVersion>4.0.0</modelVersion>
<groupId>com.ibm.webdriver</groupId>
<artifactId>wdrivertest</artifactId>
<version>0.0.1-SNAPSHOT</version>
<name>wdrivertest</name>
<dependencies>
<dependency>
<groupId>org.seleniumhq.selenium</groupId>
<artifactId>selenium-firefox-driver</artifactId>
<version>3.6.0</version>
</dependency>
</dependencies>
</project>
- Crie uma classe com o seguinte conteúdo:
package wdrivertest; import org.openqa.selenium.By; import org.openqa.selenium.WebDriver; import org.openqa.selenium.WebElement; import org.openqa.selenium.firefox.FirefoxDriver; /** * This class show how to use selenium web driver * https://github.com/julianommartins/seleniumWebDriver * @author julianom * */ public class WebDriverExample { public static void main(String[] args) { // If you want to load a existing profile // Option 1 // ProfilesIni profile = new ProfilesIni(); // FirefoxProfile julianoProf = profile.getProfile("default"); // FirefoxOptions options = new FirefoxOptions().setProfile(julianoProf); // // Option 2 // DesiredCapabilities capabilities = DesiredCapabilities.firefox(); // capabilities.setCapability("marionette", true); // capabilities.setCapability(FirefoxDriver.PROFILE, julianoProf); // you need to download geckodriver (https://github.com/mozilla/geckodriver/releases) // and extract to your machine (this example is for Linux, if you // are using windows, change to your local folder and add the .exe extension System.setProperty("webdriver.gecko.driver", "/opt/geckodriver/geckodriver"); // option 1 to use existing profile //WebDriver driver = new FirefoxDriver(options); // option 2 to use existing profile //WebDriver driver = new FirefoxDriver(capabilities); WebDriver driver = new FirefoxDriver(); // Opening Google driver.get("http://www.google.com"); // q its the search box name/ID WebElement element = driver.findElement(By.name("q")); // Seaching for Juliano Marcos Martins - me element.sendKeys("Juliano Marcos Martins"); // Submit the form element.submit(); // Printing the page title - just for example System.out.println("Page title is: " + driver.getTitle()); // If you want to Close the browser, uncomment this line // driver.quit(); } } - Você vai precisar baixar o Geckodriver na sua máquina e colocar em um diretório qualquer. Veja que no código Java apontamos para esse diretório.
- Rode sua classe: você vai ver que uma instancia do Navegador será aberta e a busca efetuada.
O projeto maven pode ser baixado de https://github.com/julianommartins/seleniumWebDriver
Enjoy!
Watson Explorer Content Analytics installation – Steps
I installed Watson Explorer Content Analytics several times in the last months, then, I created a simple Step by step that can be useful to who is starting to work with this. I’m sharing here, please, fell free to add any comment and help me to improve this how-to. Hope that can be useful to you if you are here :D.
Pre-Installation Checklist / Pre-requisites
The following steps should be performed to prepare the server for software installation. This step by step cover the installation in a Red Hat 7 machine. The following 32-bit libraries are required on Linux x86-64 systems:
- libstdc++33 (compat-libstdc++-33.i686 / libstdc++33-32bit)
- libstdc++ (libstdc++.i686 / libstdc++6-32bit)
- zlib (zlib.i686 / libz1-32bit / zlib-32bit)
- libXext (libXext.i686 / libXext6-32bit / xorg-x11-libXext-32bit)
- libXft (libXft.i686 / libXft2-32bit / xorg-x11-libs-32bit)
- libXi (libXi.i686 / libXi6-32bit / xorg-x11-libs-32bit)
- libXp (libXp.i686 / libXp6-32bit / xorg-x11-libXp-32bit)
- libXtst (libXtst.i686 / libXtst6-32bit / xorg-x11-libs-32bit)
- libXm (if thumbnails are needed)
- libXt (if thumbnails are needed)
- java-1.8.0-ibm-1.8.0.2.10-1jpp.7.el6.x86_64
- Httpd
The commands to install the libraries are:
- yum install -y libstdc++.i686 libXext.i686 libXft.i686 libXi.i686 libXp.i686 libXtst.i686 libXt.i68
- yum install -y zlib.i686 httpd
- yum -y install apr apr-util boost-filesystem boost-iostreams boost-program-options boost-regex boost-serialization
-
If SELinux is enabled, then it will need to be disabled during installation of WEX
-
Ensure that the disk space has been allocated to the WEX installation path
-
The default path is /opt/ibm/dataexplorer
-
Ensure that the disk space for /tmp partition have sufficient space for the installation, at least 10 gb
If not assign the tmp to a directory that has extra space with the commands:
- mkdir /opt/IBM/dataexplorer/tmp
- export IATEMPDIR=/opt/IBM/dataexplorer/tmp
-
Install a web server to run the Foundational Components -> On Linux install the latest version of Apache (not required for AC)
-
Ensure that the LINUX subscription libraries are available for the yum command
-
DB2 connect client configured
-
Install Java – java-1.8.0-ibm-1.8.0.2.10-1jpp.7.el6.x86_64 (you can get the package from oracle also, make sure to add Java to the server path)
Users and Folders creation for WEX AE (must be perform with root level access)
- Add installation account (esadmin) for server install.
- useradd esadmin
- create a password for the esadmin user (usually esadmin12)
- Create Watson Directories
- mkdir -p /watson/archives
- Copy the installation tarball onto the server into.
- Untar the tarball that contains installation files.mkdir /opt/IBM/dataexplorer/WATSON_EXPR_ADV_EAC_V11.0.2_LNX_M
cd /opt/IBM/dataexplorer /WATSON_EXPR_ADV_EAC_V11.0.2_LNX_M
tar -xvf ./watson/archives/WATSON_EXPR_ADV_EAC_V11.0.2_LNX_M.tar
WEX AE Installation Details:
- (Note must be performed with root level access) Install the software. (Note: Responses for Master node when selecting server type)
-
- cd /opt/IBM/dataexplorer/WATSON_EXPR_ADV_EAC_V11.0.2_LNX_M/
- ./install.bin -i console
- Installation Responses: (Also see installation screenshots below)
- Choose Locate : English
- PRESS TO CONTINUE:
- Press Enter to continue view license agreement or 1 to accept: 1 (accept)
- Enter fully qualified hostname of this server: (Hostname will be detected, hit enter. see example below)
-
- Administrator user name: (Default: esadmin): (Hit enter to take default)
-
- Create user account Enter the Number for your choice..: 2 ( the administrator user account ‘esadmin’ already exists)
-
- Enter Administrator Account password: your_esadmin_password that you created for the user earlier (esadmin12)
-
- Select a Server Type: (Response depends on type of server being installed on)
- (1 –Master all on one server )
- Select a Server Type: (Response depends on type of server being installed on)
If installation is consists of a single server.
-
-
- (2 -Master Distributed Server )
-
If installation consists of multiple servers, and the current server is the Master server
-
-
- (3 -Additional Server )
-
If the installation is for a server (ie.. Search Server) that will connect to a Master
Select: 1
-
- Do you want to install advanced options: 1 (YES)
- Enter absolute path of the data directory ES_NODE_ROOT (default: /opt/IBM/dataexplorer/esdata ) /opt/IBM/dataexplorer/esdata
- Enter the absolute path to install : /opt/IBM/dataexplorer/es
-
- Common Communication Layer Port (default: 6002) Hit enter for the default
-
- Search Server ESSearchServer Port (default: 8394) Hit enter for the default
-
- Web Application Server (default embedded) 1 –embedded
-
- Enterprise Search Application and Content Analytics Miner Port (default 8393) Hit enter for the default
-
- THE INSTALLATION WILL BEGIN AND RUN ABOUT 5-10 MINUTES
- THE INSTALLATION WILL BEGIN AND RUN ABOUT 5-10 MINUTES
…
-
- This completes the WAC (Watson Content Analytic) installation
- You can start esadmin to test:
- /opt/IBM/es/bin/esadmin system startall
- Go to admin console and check:
- http://:8390/ESAdmin/
Install SIRE (Statistical Information and Relation Extraction) module
1. Stop esadmin – /opt/IBM/es/bin/esadmin system stopall
2. Iinstall the pre-req libraries:
yum -y install apr apr-util boost-filesystem boost-iostreams boost-program-options boost-regex boost-serialization
- go to /opt/IBM/dataexplorer/es/bin/sire and run
rpm -ivh sire-20161109-1.x86_64.rpm
- Stop esadmin – /opt/IBM/es/bin/esadmin system stopall
- Start esadmin – /opt/IBM/es/bin/esadmin system startall
- Installation is complete
Uninstall Notes
To Uninstall the WAC application (Note must be performed with root access), switch to root level account and perform the command:
/opt/IBM/dataexplorer/es/uninstall_11.0.1.0./uninstall_11.0.1.0 -i console
WEX AE System Start-up / Shutdown
To stop the services:
- /opt/IBM/es/bin/esadmin system stopall
To start the services:
- opt/IBM/es/bin/startccl.sh -bg
- /opt/IBM/es/bin/esadmin system start
- /opt/IBM/es/bin/esadmin system startall
Ubuntu / Linux desligando Wireless quando usa Bateria
Praticamente sempre que desconecto meu notebook (Thinkpad T430) da tomada, e deixo somente na bateria, o Wireless torna-se instável e é desligado. Quem faz esse desligamento é o utilitário /usr/sbin/pm-powersave. Você pode constatar isso efetuando o comando “ls -lrt /var/log” assim que o evento ocorrer. Verifique as ultimas linhas dos logs modificados e vai achar o vilão!
Para resolver, basta executar o comando:
sudo /usr/sbin/pm-powersave false
Você deve também criar um arquivo vazio em /etc/pm/power.d/wireless , dessa forma, o powersave não desligará o Wireless.
Enjoy!
Adding a scheduled task to Cron at Linux
Lets suppose that you have to run some task (a script for example) called test.sh every day at 6 and 12. You can use Linux Cron to schedule it.
Enter the command crontab -e to edit your cron schedule, then, add the lines:
00 6 * * * //test.sh
00 12 * * * //test.sh
Then, just save the file and voilà!
Cron its very flexible, you can configure minutes, seconds, days, months and years, and create complex schedules!
Enjoy!
Process check script for Linux
Sometimes I need to keep checking the some process is running in my servers. So, I created the following script and add it to Crontab. If I have problems, Ill receive an email.
This can be useful to someone!
In my example, Im searching for a process called zookeeper.
#!/bin/bash
SERVER="PROD 134"
ZK=`ps aux | grep zookeeper | grep -v "grep" | wc -l`

if [ $ZK -ge 1 ]
   then
        echo "ZK is Running"
   else
        echo "ZK is not Running" | mail -s "Zookeeper is not running - $SERVER" myemail@br.ibm.com
fi
Disk Space script for Linux
Sometimes I need to keep checking the disk space at my servers. So, I created the following script and add it to Crontab. If I have problems, Ill receive an email.
This can be useful to someone!
#!/bin/bash
# In my case im interested in a specific partition /opt/XYZ
SPACE=`df -h | grep /opt/XYZ | awk '{print $4}' | awk -F % '{print $1}'`

case $SPACE in
        9[1-9])
        echo "Disk space > 90 %, please check" | mail -s "Disk Space problem" email1@br.ibm.com,email2@br.ibm.com;;
        100)
        echo "Disk Full, please check" | mail -s "DISK FULL" email1@br.ibm.com,email2@br.ibm.com;;
esac
Adding DB2 jdbc drivers to a Maven Java project
You need to get the DB2 drivers, in my case db2jcc.jar and db2jcc_license_cu.jar, then, drop it to a folder at your file system, also, in my case I created a folder /opt/driveDB2 and drop the 2 files there.
Then, run the mvn install command, like in my examples (pay attention in your Version):
mvn install:install-file -Dfile=/opt/driveDB2/db2jcc.jar -DgroupId=com.ibm.db2.jcc -DartifactId=db2jcc4 -Dversion=10.1 -Dpackaging=jar -DgeneratePom=true -DcreateChecksum=true
mvn install:install-file -Dfile=/opt/driveDB2/db2jcc_license_cu.jar -DgroupId=com.ibm.db2 -DartifactId=db2jcc_license_cu -Dversion=10.1 -Dpackaging=jar -DgeneratePom=true -DcreateChecksum=true
At your project, just add the following lines to the pom.xml file:
<dependency>
    <groupId>com.ibm.db2.jcc</groupId>
    <artifactId>db2jcc4</artifactId>
    <version>10.1</version>
</dependency>

<dependency>
    <groupId>com.ibm.db2</groupId>
    <artifactId>db2jcc_license_cu</artifactId>
    <version>10.1</version>
</dependency>
Voa lá!
Java + JDBC: imprimindo informações de tabelas
Preciso pegar as informações das tabelas/colunas nas quais fiz uma query, e sempre esqueço… Fica a dica aqui com um código bem bobinho. sugestões são bem vindas.
		Statement stmt = connection.createStatement();
		ResultSet rs = stmt.executeQuery("SELECT * FROM TABLE FETCH FIRST 10 ROWS ONLY");

		ResultSetMetaData rsmd = rs.getMetaData();
		int columnCount = rsmd.getColumnCount();

		// The column count starts from 1
		for (int i = 1; i <= columnCount; i++ ) {
		  String name = rsmd.getColumnName(i);
		  System.out.print(name + "|");
		}
		System.out.println();

		while (rs.next()) {
			String toPrint = "";
			for (int col = 1; col <= columnCount; col++) {
				toPrint += rs.getString(col) + "|";
			}
			System.out.println(toPrint);
		}
Creating a collection in IBM Watson Explorer crawling from Database
Perform a database Craw from a collection its something very common. With IBM Watson Explorer this is something very easy to do. In my example, Ill create a collection and will perform a simple query in a IBM DB2 database, but, the steps will be very similar for other databases, you just need to keep in mind that you will need the correct driver.
1- Put the driver in place:
Get the database jdbc and put in the correct folder, usually it is something like /opt/IBM/dataexplorer/WEX-11_0_2/Engine/lib/java/database/.
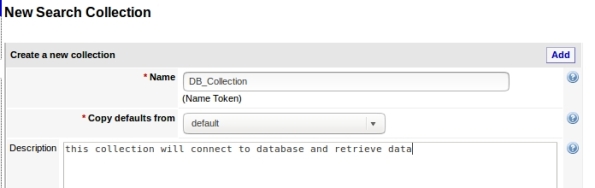
2- Create the collection copying defaults from default:
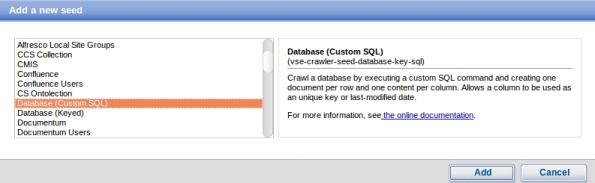
3- Add a new seed, this is where your collection will get data:

4- Choose Database:
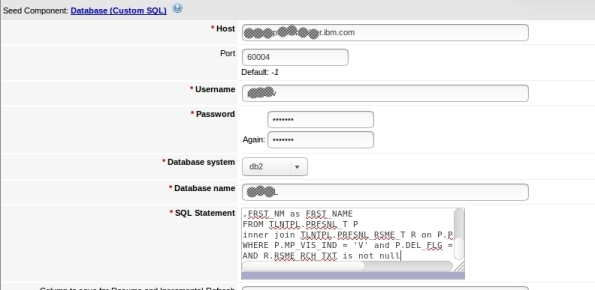
5- Enter your database settings and the query that will be performed:
6- Its done, now you can test:
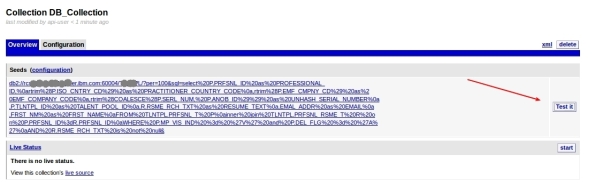
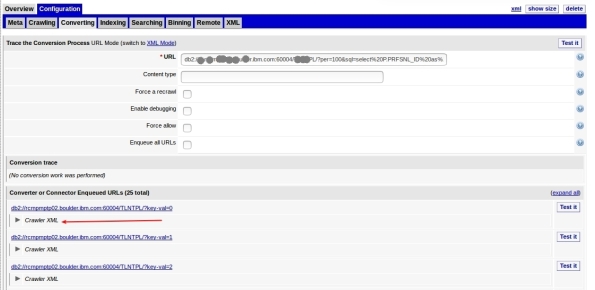
7- This can take a while depending on your query and connection, but when it finish, it will show some rows that the query returned in the following format. To see some row data, click Crawler XML:
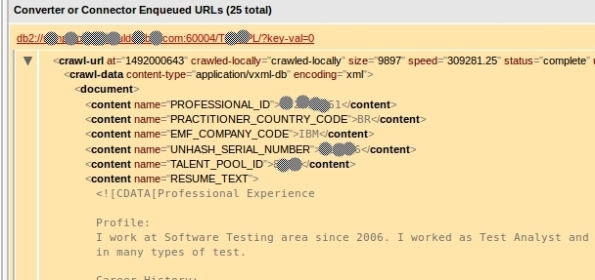
8- Here is your data:
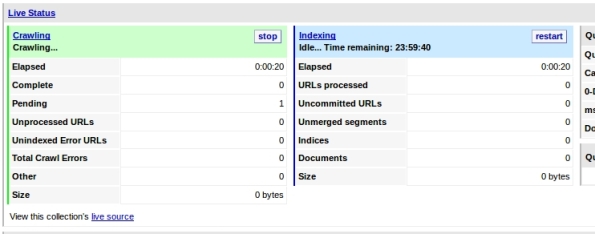
9- Now that we see that its working, you can start your craw. This step will feed your collection and can take a good time depending on your amount of data:

10-You must see Craw activity:
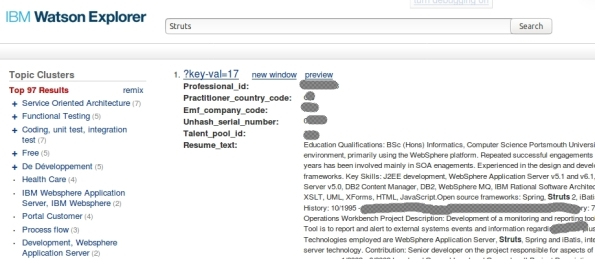
11- You can query your collection now to test, just enter your term and click search in the left options:
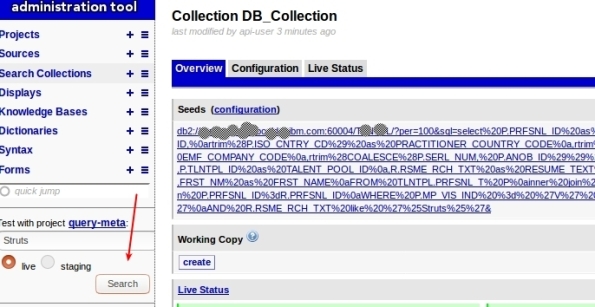
12- You will see something like this:
Thats it, you have created a collection that get data from Database!
Training your ontolections at IBM Watson Explorer
Ontolection Trainer its a nice stuff that people who are using ontolections to Improve the Queries at Watson Explorer need to know. This utility help us to analyze text body and create Thesaurus files, that can be used to create ontolections. Also, you can extract key-phrases or Acronyms that you can use with query-modifier and at some ontolection.
If you don’t know NLQ capabilities at Watson Explorer (WEX) or don’t know what is a Ontolection, I recommend that you read my 2 posts:
Backing to Ontolection Trainer, at NLQ folder (/opt/IBM/dataexplorer/WEX-11_0_2/Engine/nlq in my case) from your WEX installation (since rel 11.0.1), you can find the jar file ontolectiontrainer.jar. Obviously you will need Java to run it. Make sure that the JAVA from WEX installation are configured at your path.
The utility have several arguments, but, the basics are:
- the type of extraction
- the corpus that you will use: The corpus are your text file. In my case, I have a file with 1000 Resumes that Ill use to train WEX (RESUME_TEXT_1000.TXT ).
- the pear file: Pear file consist in the dictionary that the trainer will user to extract terms.
- the output path: Where it will create the file.
I have used a file called blacklist containing the words that I want to be ignored.
You can have problems with CPU and Memory utilization, for this cases, there are parameters to setup the number of iterations that trainer will do.
To be very objective, here is my commands:
- To extract the ontolection:
java -jar ontolectiontrainer.jar –trainOntolection –corpus RESUME_TEXT_1000.TXT –pear /opt/IBM/dataexplorer/WEX-11_0_2/Engine/data/pears/en.pear –blacklist blacklist –outputPath generatedOntolection_1000
- To extract Acronyms:
java -jar ontolectiontrainer.jar –extractAcronyms –corpus RESUME_TEXT_1000.TXT –pear /opt/IBM/dataexplorer/WEX-11_0_2/Engine/data/pears/en.pear –blacklist blacklist –outputPath generatedOntolectionAcronyms_1000
- To extract Phrases:
java -jar ontolectiontrainer.jar –learnPhrases –corpus RESUME_TEXT_1000.TXT –pear /opt/IBM/dataexplorer/WEX-11_0_2/Engine/data/pears/en.pear –blacklist blacklist –outputPath generatedOntolectionPhrases_1000
For more reference:
Enjoy.

